UV testing and Cutting Glass (Optional)
Cutting a piece of UV transparent glass becomes necessary when you do not have a piece of glass that will fit in the UV curing chamber and rest on top of your PCB during the UV curing process. You will need to find a piece glass, check that it is UV transparent (at least 60%) and make sure that the glass is not tempered. If the glass is not UV transparent the UV chamber will not evenly expose your photoresist. If the glass is tempered you will not be able to cut it effectively.
Checking for Tempered Glass
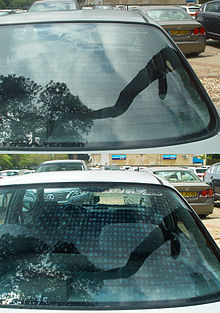
If you have glass that needs to be cut you will need to make sure it is not tempered. If you try to cut tempered glass, the cut will release internal tension and shatter the whole sheet of glass. Tempered glass will sometimes have small indications called "bugs' printed in the corner of the glass that will say "TEMP" or "TEMPERED". If your glass does not there are a few other indications of tempered glass. Viewing tempered at an glass through polarized sunglasses will reveal stress spots. These are frequently noticed in the tempered glass in car windows. The images below show a car window viewed without (the top image) and with (the bottom image) a polarizing filter.
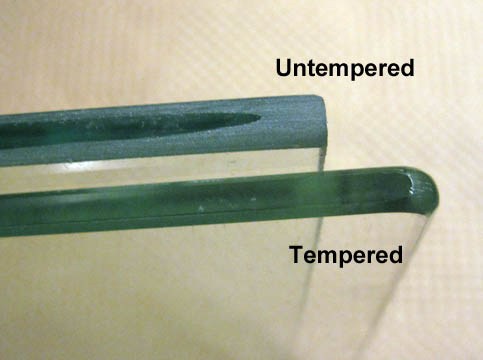
Another way to tell is to check the edges of the glass. Tempered glass typically has very smooth, glossy edges while untempered glass (annealed glass) may have rougher edges.
If your glass does not have any of these indicating signs of being tempered, you should have a high level of confidence that your glass is not tempered. Unfortunately, the only way to be 100% sure whether or not the glass is tempered is to cut it.
Checking the Glass for UV Transparency
To check your sheet of glass for UV transparency you will need a 365 nm light source (like the UV curing chamber) and an optical power meter (OPM). Also be aware that 365 nm light can damage your eyes, so wear UV protective goggles. Place the light detecting head of the OPM in the UV curing chamber with an unobstructed view of the UV light source. Close the lid and turn on the chamber. Note the power output (turn the dial until the power output is roughly 0.3 mW). Now, without moving the OPM head (moving the head will change the power reading), place your glass directly on top of the head such that no light can enter the detector without passing through the glass. Again close the lid and note the power output. If the glass is UV transparent the power output should be roughly 60% of 0.3 mW or higher and this glass can be used.
Because the light from the UV curing chamber isn't completely uniform, you may want to test the transparency several times, especially if the glass is only slight less than 60% UV transparent.
Cutting the Glass
The best place to cut your glass is the UO Craft Center's glass studio. If you bring your sheet of glass to the craft center and ask to use the glass studio a glass tech will be able to assist you in cutting your glass to size. Note: only making straight cuts yield better results (make a single 90° cut will be very difficult, instead make two straight cuts); also note that if you score your glass and cannot break it with the glass breaking pliers you may have tempered glass (at this point I would recommend looking for a different piece of glass).
Put on safety glasses before you begin.
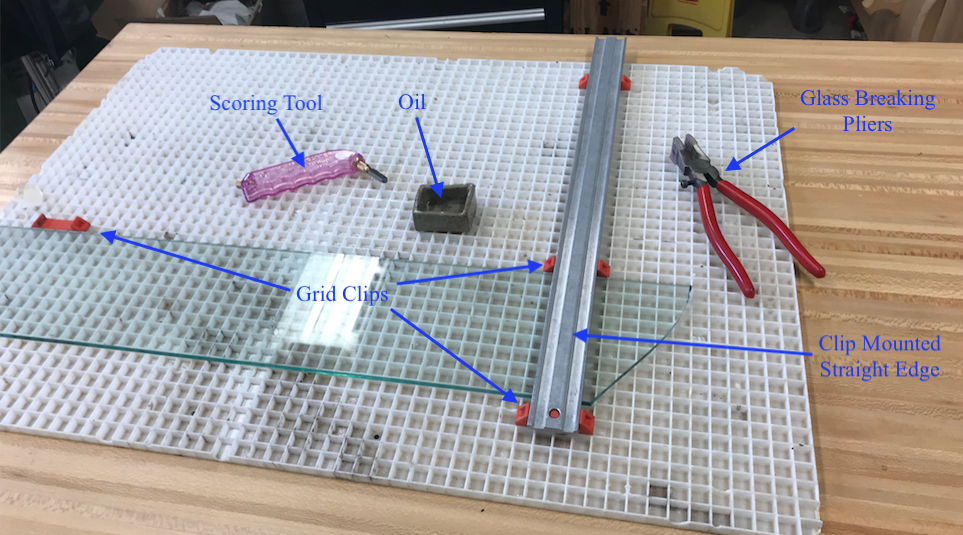
Below is a picture of the set up you'll want for cutting glass:
The piece of glass should lie on the white plastic grid with the orange grid clips holding it in place. The silver, clip mounted straight edge should then be placed in the grid clips on top of your glass, this will allow you to use the scoring tool to make a straight cut. Once the glass is held in place, dip the tip of the scoring tool in oil and score the glass along the straight edge. To score glass you want to only make one pass. Start at the top and then, pressing firmly, roll the tool along the glass using the straight edge as a guide. You should see a white line appear as you score and you will feel the glass crunch a little as you roll. If you do not press firmly enough the glass will not "crunch" as you roll the tool along, if you press too hard you may accidentally break the glass (this is unlikely though).
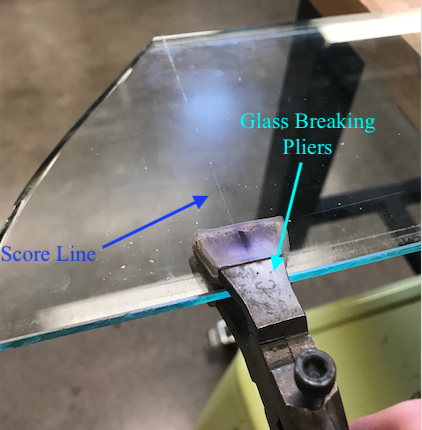
Once you've scored your glass you'll want to cut it. Cutting it is really just a controlled break using the pliers. The glass breaking pliers are used to apply pressure along the scored line and crack the glass. Most of the pliers have a black line on the tip where you should align the score mark on the glass. Below is a photo of how to align your glass for the break:
Once you have the glass aligned, squeeze the pliers firmly, if you have untempered glass and made a good score line the glass should easily break along the line. The last step is to polish the edges.


