Pound Drever Hall Lock-In: Difference between revisions
No edit summary |
|||
| (27 intermediate revisions by the same user not shown) | |||
| Line 8: | Line 8: | ||
[[File:PDHBasicLayout.png|thumbnail|Basic PDH Setup for laser locked to cavity]] | [[File:PDHBasicLayout.png|thumbnail|Basic PDH Setup for laser locked to cavity]] | ||
[[File:Applications PDH scetch.png|thumbnail|Basic Cavity Locked to Laser]] | [[File:Applications PDH scetch.png|thumbnail|Basic Cavity Locked to Laser]] | ||
The main concept behind the PHD lock-in method is the use of a Cavity to sense the laser frequency and then adjust the laser based on the laser-cavity frequency difference. The basic way of using a Cavity to measure a lasers frequency is by measuring the transmission or reflection of the cavity at different cavity lengths. Since, the objective is to set the laser to a stabilize a laser around a single frequency, the cavity length will not change. The frequency measurement should also be from the reflected beam of the cavity, so transmitted beam may used. If the cavity resonance is near the laser wavelength, then the reflectance can be approximated by a quadratic function. Though, you can't lock a laser to just the reflected beam because if the laser is slightly off resonance with the cavity there is no way to tell if the laser frequency is higher or lower than the cavity, you can only tell that the laser is off resonance. To fix this note that the derivative of a quadratic function is linear and therefore would fix the frequency ambiguity of the quadratic function. Now, in order to sense the derivative of the reflected beam, with respect to frequency, the laser needs to have is frequency varied. The reason for varying the laser frequency, is to allow for a discrete approximation of a derivative. This means that the reflected beam will have three frequencies, each with there own intensities, based on the reflectance at the respective frequencies. Therefore, when the reflected beam hits the detector, the detector will detect a beat frequency. This beat frequency will create AC signals based on the frequency interaction. In order to know what side of the cavity resonance the laser is on, an analysis of the cavities effect of the lasers side bands is needed. The detector will output quite a few frequencies, but the ones of interest are oscillating at frequency that the laser is being driven at, i.e. the side band beat frequency. to turn these AC signals into a DC signal the use of a mixer is needed, this is to turn the desired ac frequency into (ac)^2. This trick allows the use of the Trig Identity Cos(wt)^2 = 1 + Cos(2wt) | The main concept behind the PHD lock-in method is the use of a Cavity to sense the laser frequency and then adjust the laser based on the laser-cavity frequency difference. The basic way of using a Cavity to measure a lasers frequency is by measuring the transmission or reflection of the cavity at different cavity lengths. Since, the objective is to set the laser to a stabilize a laser around a single frequency, the cavity length will not change. The frequency measurement should also be from the reflected beam of the cavity, so transmitted beam may used. If the cavity resonance is near the laser wavelength, then the reflectance can be approximated by a quadratic function. Though, you can't lock a laser to just the reflected beam because if the laser is slightly off resonance with the cavity there is no way to tell if the laser frequency is higher or lower than the cavity, you can only tell that the laser is off resonance. To fix this note that the derivative of a quadratic function is linear and therefore would fix the frequency ambiguity of the quadratic function. Now, in order to sense the derivative of the reflected beam, with respect to frequency, the laser needs to have is frequency varied. The reason for varying the laser frequency, is to allow for a discrete approximation of a derivative. This means that the reflected beam will have three frequencies, each with there own intensities, based on the reflectance at the respective frequencies. Therefore, when the reflected beam hits the detector, the detector will detect a beat frequency. This beat frequency will create AC signals based on the frequency interaction. In order to know what side of the cavity resonance the laser is on, an analysis of the cavities effect of the lasers side bands is needed. The detector will output quite a few frequencies, but the ones of interest are oscillating at frequency that the laser is being driven at, i.e. the side band beat frequency. to turn these AC signals into a DC signal the use of a mixer is needed, this is to turn the desired ac frequency into (ac)^2. This trick allows the use of the Trig Identity Cos(wt)^2 = 1 + Cos(2wt), meaning that with the addition of a low pass filter, a DC signal based of the magnitude of the the difference of the center frequency and the sideband that gets reflected the most can be obtained. | ||
=== Setup === | |||
[[File:Fabry-Perot-Setup.bmp|thumbnail|Test Setup]] | [[File:Fabry-Perot-Setup.bmp|thumbnail|Test Setup]] | ||
[[File:EXperimental_setup-bmp13.jpeg|thumbnail|Beat Frequency Detection Setup]] | |||
Our former setup was configured as a Fabry-Perot Interferometer. This setup was used to verify that our Fabry-Perot Cavity was tuned and aligned to the laser. This past setup was to align the Cavity to a specific beam path that another laser could be aligned to. The main reason for having an alignment laser was because our diode laser had a bad mode structure and was low power, by using a Helium-Neon laser we are able to align to Cavity to a high finesse without the difficulty of having to deal with bad modes. Also note that M2 is a flip mirror and the there is another set of beam steering mirrors behind it for the diode laser, which is not shown. | |||
Our current setup is configured like a Fabry-Perot Interferometer, but with the back-reflected cavity light going to a fast photodiode. This setup is used to test for the beat frequency from the laser sidebands and the stored cavity light. In order for the photodiode to pickup the beat frequency, the ECDL must have balanced sidebands and be near the cavities center frequency. These conditions will allow the detector to pick up three cases: | |||
1) The laser is on the center frequency and the sidebands cancel out. | |||
2) The laser frequency is lower than the cavity center frequency and the lower sideband interacts with the stored laser frequency, making a beat frequency. | |||
3) The laser is frequency is greater than the center frequency of the cavity, then the upper sideband interacts with the stored laser frequency. | |||
With these three cases we are able to tell the laser which way to change it's frequency in order for it to stay centered on the cavity frequency. | |||
=== Progress === | === Progress === | ||
==== Past Progress ==== | ==== Past Progress ==== | ||
We started this project this term, so most of our goals have been based off of theory and setting up the Fabry Perot Cavity. Our first goal was to understand the theory behind the PDH method, which is shown in the theory section; this entailed some time doing internet research. This research lead us to some debate on how the feedback circuit works, if you ignore the frequency interaction then the error signal would relax once the cavity was centered and then there would be no feedback to hold the cavity on center; this was shown to be incorrect as we failed to take into account the beat frequency.<br /> | |||
<br /> | |||
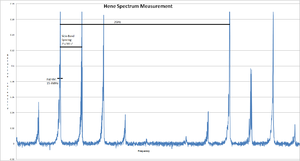
With the theory of this project understood, we moved on to testing the individual components. We started with testing the performance of the grad students Fabry Perot Cavity. The Cavity couldn't be aligned because the rear mirror was misaligned, so there was a limit to how well we could increase the cavity finesse. After much testing the most finesse that could be achieved, that we achieved, was little over 30. Though ideally this would work, the problem id that the misalignment seems to increase largely with the mirror distance meaning that a the finesse changes largely with the cavity length change. The test setup for this measurement is the same test setup as the figure above. This problem was solved by replacing the Fabry Perot Cavity with a manufactured one. The cost of this replacement was that the required finesse would be above 50~60. We were able to get a Finesse of about 100 with the new cavity. | |||
[[File:HENE-SPEC-MEASURMENT.bmp|thumbnail|New Fabry Perot Finesse Measurement]] | |||
<br /> | |||
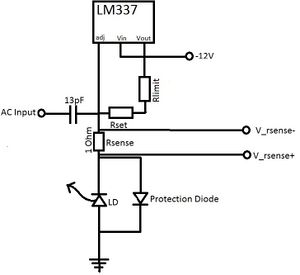
With the Cavity tested, we moved to the diode laser Bias Tee. The Bias Tee that was installed in the custom diode laser apparently had an inductor and a capacitor in series. This is assumed as an error as the inductor was an adjustable one. In the end we rebuilt the Bias Tee onto the laser driver circuit. The only problem with the driver circuit was that it was made to output 250mA, which will easily overdrive our laser diode. We tried to limit the max current, but failed to find a way to modify the circuit. To solve this problem we decided to buildNo past progress as this project just started our own current source. This ended well, but while we were trying to have a negative current source, we misused the LM317 which is a "positive" voltage regulator. To solve this we require a negative adjustable voltage regulator, the LM337. | |||
[[File:LD_Current_Supply.jpg|thumbnail|Laser Driver Circuit (Supplies Current)]] | |||
==== Current Progress ==== | ==== Current Progress ==== | ||
We started | We started this term rebuilding our laser power supply with the LM337, this made our laser work. We ran into problems when we started to use a different laser diode and needed to set a different current limit. To solve this we changed the fixed R_limit with a 100 ohm pot. With our laser power supply working once again we started to realign our Fabry Perot Cavity, though we failed to get a good spectral profile. To solve this problem we went to bryan, who suggested that we increase our laser diode's driving current, this along with adjusting the diffraction grating, while looking at the spectral profile, allowed us to get a near perfect profile. With a good spectral profile we started to experiment with adding a ac current to our laser. We started with a 100Mhz sine wave with a Vpk-pk of .1V, slowly increasing the voltage by .1 Volts; we started to see side bands at 600mV pk-pk. In the end we decided to try to over drive the laser diode by decreasing the temperature to about 18C; this would allow us to drive the laser diode at higher currents without the danger of thermal runaway. At the end of this overdriving we ended with a ac bias of 160Mhz at 1.7Vpk-pk. | ||
[[File:Ld_sideban.jpg|thumbnail|ECDL sidebands transmitted]] | |||
After creating stable sidebands on the laser we started to get the Fabry Perot cavity centered on our lasers frequency. This proved difficult as the the cavity driver is not made for fine cavity adjustments. After some trial and error we were able to center the cavity, such that we maximized the transmitted light. Though, We ran into a problem when detecting a beat frequency off our detector. The problem we ran into was that our detector's amplifier picked up the RF modulation, creating noise. We tried to limit the noise through the use of a Faraday Cage, but didn't inhibit the noise. We ended up checking our BNC cables for imperfections, which yielded no results. On a guess we moved the amplifier's power cord from the ceiling plugs, to the floor plugs; this allowed the steel table to shield the cord from RF noise. With the RF noise greatly reduced we were able to detect the beat frequency, although the amplitude of the frequency was independent of the cavity. We think that this result means that the sidebands are of unequal amplitude and therefore won't cancel out when the laser is on resonance with the cavity | |||
[[File:ECDL Beat Freq FFT.jpg|thumbnail|Beat Frequency FFT (orange) modulation(purple)]] | |||
==== Future Plans ==== | ==== Future Plans ==== | ||
The next step in this project is to optimize the laser sidebands. Currently the nonuniform of the sidebands is so great that the signal from the cavity is over powered. To solve this problem both the sidebands and the cavity signal must be optimized. The optimization of the sidebands will allow the sidebands to cancel out, or cancel more than they are. By optimizing the cavity we will be able to discern the sidebands effect on the light stored in the cavity. With these corrections the beat frequency should correspond to the laser-cavity frequency difference. | |||
Latest revision as of 21:22, 12 June 2014
Pound Drever Hall Lock-In Project
Overview
The Pound Drever Hall, or PDH, Lock-In Project is desinged to prepare students for working with tunable lasers, high frequency electronics, and optical Cavities. The objective of this project, as the name entails, is to uses the PHD technique to lock a tunable laser to a cavity. Both the laser and the cavity will be constructed by the students using suplied parts, allowing the students to learn the theory behind tunable lasers and the logistics of constucting an optical cavity.
Theory
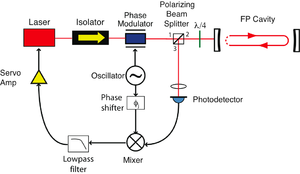
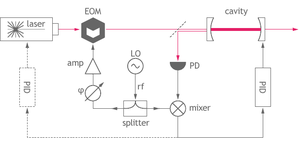
The main concept behind the PHD lock-in method is the use of a Cavity to sense the laser frequency and then adjust the laser based on the laser-cavity frequency difference. The basic way of using a Cavity to measure a lasers frequency is by measuring the transmission or reflection of the cavity at different cavity lengths. Since, the objective is to set the laser to a stabilize a laser around a single frequency, the cavity length will not change. The frequency measurement should also be from the reflected beam of the cavity, so transmitted beam may used. If the cavity resonance is near the laser wavelength, then the reflectance can be approximated by a quadratic function. Though, you can't lock a laser to just the reflected beam because if the laser is slightly off resonance with the cavity there is no way to tell if the laser frequency is higher or lower than the cavity, you can only tell that the laser is off resonance. To fix this note that the derivative of a quadratic function is linear and therefore would fix the frequency ambiguity of the quadratic function. Now, in order to sense the derivative of the reflected beam, with respect to frequency, the laser needs to have is frequency varied. The reason for varying the laser frequency, is to allow for a discrete approximation of a derivative. This means that the reflected beam will have three frequencies, each with there own intensities, based on the reflectance at the respective frequencies. Therefore, when the reflected beam hits the detector, the detector will detect a beat frequency. This beat frequency will create AC signals based on the frequency interaction. In order to know what side of the cavity resonance the laser is on, an analysis of the cavities effect of the lasers side bands is needed. The detector will output quite a few frequencies, but the ones of interest are oscillating at frequency that the laser is being driven at, i.e. the side band beat frequency. to turn these AC signals into a DC signal the use of a mixer is needed, this is to turn the desired ac frequency into (ac)^2. This trick allows the use of the Trig Identity Cos(wt)^2 = 1 + Cos(2wt), meaning that with the addition of a low pass filter, a DC signal based of the magnitude of the the difference of the center frequency and the sideband that gets reflected the most can be obtained.
Setup

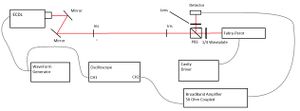
Our former setup was configured as a Fabry-Perot Interferometer. This setup was used to verify that our Fabry-Perot Cavity was tuned and aligned to the laser. This past setup was to align the Cavity to a specific beam path that another laser could be aligned to. The main reason for having an alignment laser was because our diode laser had a bad mode structure and was low power, by using a Helium-Neon laser we are able to align to Cavity to a high finesse without the difficulty of having to deal with bad modes. Also note that M2 is a flip mirror and the there is another set of beam steering mirrors behind it for the diode laser, which is not shown.
Our current setup is configured like a Fabry-Perot Interferometer, but with the back-reflected cavity light going to a fast photodiode. This setup is used to test for the beat frequency from the laser sidebands and the stored cavity light. In order for the photodiode to pickup the beat frequency, the ECDL must have balanced sidebands and be near the cavities center frequency. These conditions will allow the detector to pick up three cases:
1) The laser is on the center frequency and the sidebands cancel out.
2) The laser frequency is lower than the cavity center frequency and the lower sideband interacts with the stored laser frequency, making a beat frequency.
3) The laser is frequency is greater than the center frequency of the cavity, then the upper sideband interacts with the stored laser frequency.
With these three cases we are able to tell the laser which way to change it's frequency in order for it to stay centered on the cavity frequency.
Progress
Past Progress
We started this project this term, so most of our goals have been based off of theory and setting up the Fabry Perot Cavity. Our first goal was to understand the theory behind the PDH method, which is shown in the theory section; this entailed some time doing internet research. This research lead us to some debate on how the feedback circuit works, if you ignore the frequency interaction then the error signal would relax once the cavity was centered and then there would be no feedback to hold the cavity on center; this was shown to be incorrect as we failed to take into account the beat frequency.
With the theory of this project understood, we moved on to testing the individual components. We started with testing the performance of the grad students Fabry Perot Cavity. The Cavity couldn't be aligned because the rear mirror was misaligned, so there was a limit to how well we could increase the cavity finesse. After much testing the most finesse that could be achieved, that we achieved, was little over 30. Though ideally this would work, the problem id that the misalignment seems to increase largely with the mirror distance meaning that a the finesse changes largely with the cavity length change. The test setup for this measurement is the same test setup as the figure above. This problem was solved by replacing the Fabry Perot Cavity with a manufactured one. The cost of this replacement was that the required finesse would be above 50~60. We were able to get a Finesse of about 100 with the new cavity.
With the Cavity tested, we moved to the diode laser Bias Tee. The Bias Tee that was installed in the custom diode laser apparently had an inductor and a capacitor in series. This is assumed as an error as the inductor was an adjustable one. In the end we rebuilt the Bias Tee onto the laser driver circuit. The only problem with the driver circuit was that it was made to output 250mA, which will easily overdrive our laser diode. We tried to limit the max current, but failed to find a way to modify the circuit. To solve this problem we decided to buildNo past progress as this project just started our own current source. This ended well, but while we were trying to have a negative current source, we misused the LM317 which is a "positive" voltage regulator. To solve this we require a negative adjustable voltage regulator, the LM337.
Current Progress
We started this term rebuilding our laser power supply with the LM337, this made our laser work. We ran into problems when we started to use a different laser diode and needed to set a different current limit. To solve this we changed the fixed R_limit with a 100 ohm pot. With our laser power supply working once again we started to realign our Fabry Perot Cavity, though we failed to get a good spectral profile. To solve this problem we went to bryan, who suggested that we increase our laser diode's driving current, this along with adjusting the diffraction grating, while looking at the spectral profile, allowed us to get a near perfect profile. With a good spectral profile we started to experiment with adding a ac current to our laser. We started with a 100Mhz sine wave with a Vpk-pk of .1V, slowly increasing the voltage by .1 Volts; we started to see side bands at 600mV pk-pk. In the end we decided to try to over drive the laser diode by decreasing the temperature to about 18C; this would allow us to drive the laser diode at higher currents without the danger of thermal runaway. At the end of this overdriving we ended with a ac bias of 160Mhz at 1.7Vpk-pk.
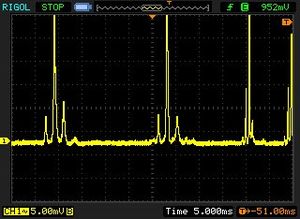
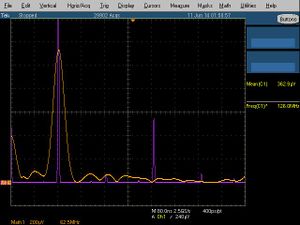
After creating stable sidebands on the laser we started to get the Fabry Perot cavity centered on our lasers frequency. This proved difficult as the the cavity driver is not made for fine cavity adjustments. After some trial and error we were able to center the cavity, such that we maximized the transmitted light. Though, We ran into a problem when detecting a beat frequency off our detector. The problem we ran into was that our detector's amplifier picked up the RF modulation, creating noise. We tried to limit the noise through the use of a Faraday Cage, but didn't inhibit the noise. We ended up checking our BNC cables for imperfections, which yielded no results. On a guess we moved the amplifier's power cord from the ceiling plugs, to the floor plugs; this allowed the steel table to shield the cord from RF noise. With the RF noise greatly reduced we were able to detect the beat frequency, although the amplitude of the frequency was independent of the cavity. We think that this result means that the sidebands are of unequal amplitude and therefore won't cancel out when the laser is on resonance with the cavity
Future Plans
The next step in this project is to optimize the laser sidebands. Currently the nonuniform of the sidebands is so great that the signal from the cavity is over powered. To solve this problem both the sidebands and the cavity signal must be optimized. The optimization of the sidebands will allow the sidebands to cancel out, or cancel more than they are. By optimizing the cavity we will be able to discern the sidebands effect on the light stored in the cavity. With these corrections the beat frequency should correspond to the laser-cavity frequency difference.